An Easy Cold Frame Design
A good, simple cold frame design is one which is easy to make and easy to use. Having a cold frame is a great way to extend the growing season for your home grown crops.
Many salad vegetables can be started in cold frames quite early in the season and some can even be grown right through the winter in many temperate regions, so a cold frame is a great asset for anyone who wants to grow more of their own food.
Cold frame designs are many and you will find plenty of choice if you are prepared to pay.
Good cold frame design - what to look for
So what's good to look for in a cold frame design? Is there anything much to choose between them?
As ever, the answer depends upon what you want. Some people will want something which works like a mini greenhouse for growing crops; others will just want a garden cold frame for hardening off plants to prepare them for planting out.
Here are a few things to consider when searching for the best cold frame design for you and for a greener lifestyle, whatever your needs.
- A good cold frame should have ample room for pots and seed trays. There should be removable glass "lights" (windows). The glass helps to keep the plants warm and wind-proof in poor weather and can be removed or opened in warmer weather so that plants do not dry out or frazzle in the heat.
- There should be a gentle slope to the glass so that water runs off easily - 10 to 15 degrees from the horizontal is enough.
- The frame should be made from something durable and sturdy.
- Think about weight if you will want to move your cold frame about much. Commercial aluminium designs are good in that they are light-weight and yet sturdy. There are many new cold frame designs and materials available which may prove durable and eco-friendly.
- Think, too, about how much height you will need for your plants. If you are mainly going to use your cold frame for seed trays and lettuces you might be able to manage with a shallow box.
Cold frame design: Choosing a site
You should put your cold frame where it will be sheltered from frost and rough weather and where it will get plenty of light. The ground should be fairly flat or slightly sloped towards the sun. Make sure that the soil on your chosen site is well drained and fertile.
Alternatively, you can provide soil and compost from elsewhere and dig a bed to suit your purposes. If you are planning on growing plants directly in the soil it is best to give this some thought. Check the soil pH (acid/alkaline balance). You can do this with a simple test kit, available from most garden centres and Amazon.
If you are mainly going to be using plants in trays and pots then soil quality is not so important. You could even site your cold frame on gravel or any other free-draining surface if you are just going for pots and other containers.
Here's how to plan a cold frame on soil
First prepare your ground.
Dig the soil thoroughly to remove weeds, large stones and clumps. If you are looking for good long-term fertility it may be worth going for double trenching to get a deep, quality top soil.
Dig in manure or other sources of fertility. Leave the ground to settle for a few days.
Rake the top to a reasonably fine tilth. (It's harder to do this once the walls are up so good preparation at this early stage will be worth the effort.)
A simple, small cold frame design
Here's a cold frame design using recycled or new wood. The wood should be pressure-treated against rot.
Alternatively, if you are using untreated recycled wood you should treat everything with a good non-toxic wood preservative. From an eco-friendly perspective and for health reasons it is better to opt for a non-toxic coating. Many wood preservatives rely upon copper and other chemicals which can leach into the soil.
What you need for this simple cold frame design
- For a frame size of 125cm x 75cm buy or resource wood which is about 15cm wide (6 inches) and 2cm (around 3/4 inch) deep. You will need approximately 10 metres of this wood in total.
- You also need some uprights for which 35mm square (1 1/2 x 1 1/2 inch) is ample.
- For the lid you need 320cm (13 feet) length of wood altogether of 5cm x 2.5cm (approx) which will be cut into two lengths of 125cm and two of 76cm.
- Nails or screws can be used. Galvanised are best because they won't corrode. For the lid you will need some small staples.
- You also need some horticultural plastic sheeting 2 metres x 1 metre wide is enough. (6 feet x 3 feet, if you are using imperial measurements.)
Alternatively you can use recycled window panes or even rigid plastic sheeting.
If you use recycled windows add some plastic protection to stop the glass shattering in the event of damage. This is important for safety, as shattered glass shards can be deadly. You can buy such protective film in many larger DIY stores and also on Amazon.
If you opt for using recycled glass window frames you will need to design your frame to the dimensions of your windows.
Sponsored links
Here's how to make the cold frame
Cut the wood for the sides to the following sizes: 9 lengths of 125cm, 8 side lengths of 75cm long.
The sloping sides are achieved by cutting two angled pieces of wood: 75cm long but cut at an angle from full width tapering to just 1cm wide.
Cut the uprights to the required height. If you are using 15 cm wide wood, then you would want this to be 45cm (18 inches) for the two back wall uprights and 32cm (13 inches) for the front wall uprights. (You can easily make a shallower cold frame by using 10cm wide wood, or by using a height of two widths of 15cm wood, sloping to one width at the front.)
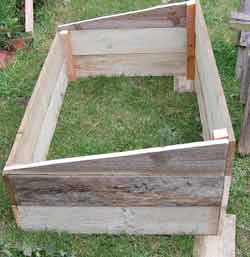
Picture, above: sloping sides are made by cutting the wood at an angle. This is probably the hardest bit!

Slope the upright tops (front and back) to the same angle as the sloping side pieces (- this isn't strictly necessary but if you want to your lid to fit snuggly, its best to cut the tops this way. If you don't want to cut the angle, just cut your uprights a little shorter so that the lid clears them easily when it's in place.)
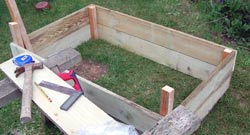
Make the frame by securing the each side wall to two uprights (45cm and 32cm). Then affix the back and front panels in the same way but overlap the joint so that a box shape is achieved.
Use either rust-proof screws or galvanised nails. Make sure that all the wooden wall lengths are neatly lined up with each other. Add the sloping wood to the side walls so that the tapering ends meet with the top of the shorter uprights. You might want to use some waterproof wood glue to secure the sloping sides to the lower side panels as well as using a nail or screw.
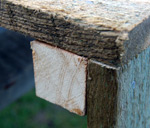
Picture, above: overlap the front and side panels to make a neat right angle
When your frame box is finished you can start on the lid. If you want additional strength (because you are planning to use the frame in different places, for example) you can add triangles of plywood to the four corners at the base.
For the top panels you can use recycled windows, or if you prefer, make a light-weight lid from wood and horticultural plastic sheeting.
Here's how to make the lid:
Cut two side struts from thin wood, approx 5cm wide, 2.5cm deep. The side struts need to be 76cm long and the back and front struts need to be 125cm long. (The slightly longer side pieces are to allow for the slope - actually 76.11cm if you like to be really accurate!) When you have cut the wood to the correct lengths, use a chisel and saw to create overlapping joints at each end of each piece of wood. Join the wood together at right angles with glue and/or screws.
Check your angles carefully with a set-square when drawing and cutting them and again before the glue sets. Alternatively, you can use angle brackets to secure the corners - easier but a little more expense.
Add triangles of thin plywood to each corner top to stabilise the angle.
Cut your horticultural plastic to size, allowing for overlapping the wood. Tuck the plastic around the wood and secure it with staples. You can use a staple gun or galvanised staples nailed into place.
When your lid is dry you can affix it to the back of the frame, either with a conventional pair of hinges or with tough webbing. Alternatively you can leave it loose and secure it with bricks or other weights so that it's quick to open.
This design leaves a 1 cm gap at the front of the lid between the lid and the frame. Just add a 1 cm strip of beading or similar wood to close the gap if you want.
Disclaimer:
This is just a simple home-build cold frame design which is not intended to be a professional piece of woodwork! If you need something more sophisticated, you may need to look elsewhere (see just below for a professional cold frame design).
Check that the dimensions mentioned are suitable for your needs before embarking upon using this design. For the very best and safest results choose non-toxic paints when you build this cold frame design.
Buying a cold frame
If all this sounds too much like hard work, there are plenty of good designs to choose from. The good cold frame design tips above are worth bearing in mind when selecting a cold frame to buy.
Here are a few examples from Amazon: Cold Frame Single This one from Parasene has a galvanised frame and looks sturdy.
This large Deluxe Cold Frame from Solexx has a reinforced steel base and twin walls for extra warmth and protection from the elements.
An Easy Cold Frame Design top of page
Green Garden - Organic Gardening
Greenfootsteps Home - for more easy green living ideas
| Tweet |

| Tweet |

Other pages that might interest you:
Using greenhouses to extend the growing season
Designing a container garden - for fun and profit
How to make leaf mold for your garden
Sponsored links
|
|
Footprints
- an occasional e-zine from Greenfootsteps
If you would like to receive the e-zine, please just sign up below.


New! Comments
Have your say about what you just read! Leave me a comment in the box below.