Easy Homemade Christmas Presents for a Greener Yuletide
Homemade Christmas presents are green Christmas presents!

Homemade Christmas presents are a delight to give and receive - so much more personal than some bought item that caught your eye amongst the Christmas glitter in the shops. And the good news is, of course, Christmas presents made at home are generally a whole lot greener than commercial ones!
Picture: Homemade flower essences or other health and beauty products are often very acceptable.
Why? Unless you are firing up a factory-like outfit to make your Christmas present, the embodied energy is likely to be far lower. Embodied energy simply means all the different energy which has gone into making the product - from the raw materials from which it is made, to the factory where it was put together and the transportation which brought it to the shop - and then to your door.
Advertisements
A Carbon free Christmas?
Of course, homemade Christmas presents have some embodied energy cost, too. If you make cushion covers, the material used will likely have been made in a factory miles away. If you bake biscuits or make sweets, some of the ingredients are likely to be imported or have been grown using fossil fuels. A carbon-free Christmas is far from easy to achieve!
Nevertheless, there are many simple gifts which can be made at home which are likely to have a far lower carbon footprint than most bought goods. And if you use some recycled materials - you get a few extra brownie points for lowering your carbon footprint even further.
Making homemade Christmas presents is also potentially cost-saving - and of course, it's fun - but you do tend to need to start well in advance of Christmas to make most presents.
The ethics of modern shopping
A consumer trend has taken over our lives: it is seen as cool and sophisticated to buy expensive stuff. Conversely, some people see homemade articles made by friends or family members as somehow less good and glamorous than shop-bought items. It's hard, particularly with older children and young adults to fight against this trend - and I don't for a moment think that the child wanting the latest computer game or this season's must have techno-toy is going to be the least bit impressed by a hand-knitted cardigan instead!
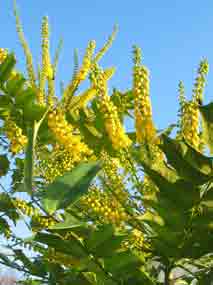
Picture: Home-grown plants can make beautiful and lasting presents; Mahonia even flowers around Christmas time!
Nevertheless, there are plenty of people who will value well-made homemade produce and will value it especially for the personal touch that it gives. Who remembers where that pulp fiction best-seller came from? Or the department store hat and gloves set? But we all remember who gave us the handmade photo-album or the handmade chocolates!
Here are a few ideas for beautiful homemade Christmas presents which can be customised to suit your family and friends.
Easy homemade Christmas presents:
Rumtopf
This is one which needs to be made well in advance. Rumtopf is a very acceptable Christmas present for almost any adult who is not tee-total! Rumtopf is made from summer fruits, preserved in generous amounts of dark rum.
Present it in an interesting jar - preferably made from re-cycled glass - and you have an easy homemade Christmas present to take to winter house parties or to friends and relations.
Full instructions on how to make rumtopf can be found here: How to Make Rumtopf
Sponsored links
Easy homemade Christmas presents:
Homemade Sloe Gin
Here's another easy homemade Christmas present.
Sloe gin is easy to make and uses fruit which is freely available to all - at least in most of Europe and northern Asia. You can use a similar method to make other drinks, too. Try brandy and vodka as a way to produce interesting and attractive presents. These are very acceptable to most people who enjoy a little alcohol-based refreshment!
Sloe gin needs to be begun about three months before Christmas to be ready in time. The resulting drink is like a sweet liqueur with a sharp refreshing taste from the sloes. Raspberry or blackcurrant gin or vodka can be made in a similar way.
Easy homemade Christmas presents:
Easy to make cushion covers
Cushion covers are easy to make in a variety of styles.
Recycled materials from your loft or the local charity shop can be used, if you like. Some towns also have scrap stores which can be very handy for sourcing cheap recycled materials and other things. Often the merchandise is completely unused - donated by local companies simply because it was surplus to requirements. Some regular material stores have off-cuts and ends of rolls which may be suitable for making cushions.
Try Googling + "scrap store" or + recycled goods. Freecycle is also an excellent source of free goods which can be recycled.
To make cushion covers you need some attractive material, needle and thread, pins, scissors, a zip for each cushion or some velcro fastening strip and a ready-made cushion pad. Choose material which is sturdy enough to put up with a bit of wear.
For a small cushion you don't need a sewing machine - hand stitching is quick enough and quite relaxing to do. You need good light to work by and somewhere flat to lay out the material.
A simple square cushion
Here are instructions for making a 30cm square cushion.
Gather all the materials,as mentioned above. You will need a zip - 20 or 25 cm ideally in the same colour as the material. Alternatively, use a strip of velcro.

- Mark out the material carefully with chalk or soft pencil, if you don't have tailor's chalk to hand. A ruler is handy for making sure that edges are straight. Check that corners are proper right angles - a large book will provide a useful guide.
- Make sure that the squares of material are big enough to accommodate the cushion pad plus about 1 cm all around (i.e. measure the cushion pad from seam to seam and add 2 cm extra each way.) This is for the seams. Even if it is a ready-made 30cm cushion pad, it's just as well to check the measurements as you will want a good fit.
- Cut the material carefully with a sharp pair of scissors. Cut two identical squares of material. It's easiest to do this by cutting the material folded over so that you cut both sides at the same time. This works well when the material is not too slithery!
- Pin the two pieces of material back to back (right sides together) around the seam line 1cm in from the edges).
- Mark the points on the seams where the zip will go - you won't stitch this bit.
- If you are unused to stitching material you should next sew the two pieces together using a tacking stitch. (If you are confident with needle and thread you can miss out this stage - but you will likely get better results if you do tack before sewing the cushion cover properly.)
- Now stitch all the seams except where the zip is. Sew the 3 sides together (the sides without the zip) using a small running stitch. At the corners, turn the material through 90 degrees and do not stitch right up to the edge. Sew the 4th side (with the zip) up to the start of the zip - and at the other side, back to the corner. Fasten off loose ends carefully.
- Trim the excess seams at the corners. Just cut across about 2mm from the stitching at the corner. This stops the corner being bulky when you turn the material right side out. Be careful not to get too close to the stitching as this can weaken the material and a hole will appear before too long. If you want you can re-inforce the corner with an extra line of stitching.
- Place the zip (closed) along the side of the cover left unstitched, with the inside facing outwards. Pin it to the seams of the cushion cover, separating them out from one another. Again, you can tack it in place if you like. Make sure that the zip is centred carefully over the seam line (the stitching line).
- Carefully unzip the zip, being careful not to impale yourself on the pins, if they are still in! If you have tacked the seam where the zip is, cut through the tacking so that you can now turn the cushion cover right side out.
- Turn the cushion cover right side out and carefully stitch the two sides of the zip in place about 2mm from the business part of the zip. Make sure that the extra pieces of material on the zip at each end are firmly attached to the seam allowances of the cushion.
- For extra strength and stability, stitch across the bottom of the zip. This stops there being a small hole where the zip ends.
- If you use velcro, stitch or glue the velcro at 5cm intervals along the unstitched side of the cushion.
- Use an iron to press the cushion cover and iron into the corners to make sure that they "sit" well. Put your pad inside the cover and zip it up.
That's it - an easy way to make cushion covers quickly and simply! These homemade Christmas presents can easily be made at other times of the year, of course.
Of course you can do more sophisticated designs. Round cushions are easy and if you like a variety of patterned materials, why not try your hand at simple quilting?
Appliqué designs can look great and personalise your gift still further. You just need to research your friends' likes and dislikes a bit more thoroughly for this, as one person's "cute" is another's "kitch"!
Easy homemade Christmas presents:
Another easy sewing project - a draft excluder
A draft excluder (draught excluder) is easy to make. You can use recycled old stockings and tights to stuff it or you can use hollowfill fibre which is lightweight and not so expensive.
The sewing skills are virtually identical to those used for the cushion cover. Its best to make an inner of ticking or other reasonably stout material. Make a cover of whatever material takes your fancy. Ideally it should be easy to wash and hard-wearing. Curtain material is a good choice.
As the design is typically long and thin, you don't really need to use a zip. Just slip-stitch the end of the sausage. When the material needs a wash, use a quick-unpick to release the stitching.
Some people like to personalise their designs to look like animals - the sausage dog used to be a staple of the sixties! Faux fur looks quite well in this role. You can let your imagination run wild. Design one end to look like a snout/dog nose/cat's face in profile. Add cloth ears eyes and tail of your chosen animal to finish.
A more classic but equally decorative effect can be achieved by using carefully chosen materials and embellishing the final piece with cording and/or tassels.
*****
Advertisements
Easy Homemade Christmas Presents
Frugal Living - Living Well on Less
Greenfootsteps Home - for more easy green living ideas
| Tweet |
 Subscribe to the blog


| Tweet |

Other pages about homemade Christmas presents and greening Christmas:
Green Christmas Ideas for Frugal Festive Fun
Sponsored links
Footprints
- an occasional e-zine from Greenfootsteps
If you would like to receive the e-zine, please just sign up below.
New! Comments
Have your say about what you just read! Leave me a comment in the box below.